|
|||
Short guidePlease note that nodewatch system is provided as is, without any warranty, expressed or implied.FeedbackPlease send feedback to feedback [at] vpsantiabuse.comSupported OSCurrent version of Nodewatch supports OpenVZ kernels 2.6.18, 2.6.32, 3.10.0. Important note on 2.6.18 kernel support: starting with version 3.20, running Nodewatch on 2.6.18 kernels is no longer recommended. We suggest that you migrate to 2.6.32. Supported OS: 64-bit RHEL/CentOS 5.x, 6.x, 7.x.
Debian users: while we do not support Nodewatch on Debian nodes, there's an unofficial guide available:
Supported Control PanelsNodewatch does not care about the installed control panel, if any (SolusVM, HyperVM, etc). It is completely independent and will not cause a conflict with any control panel.Impact on performanceNodewatch does not use iptables on the host node to track abuse. It does not alter configuration files on the node or on the individual VPS containers. This means that it does not affect your normal operations in any way and is completely transparent to your customers.We test Nodewatch on a Dual L5520 node with 500 VPS containers running different OS templates and performing random Storage and Network I/O. On this platform Nodewatch v3.40 uses approximately 50 MB of RAM and 7-8% of a single CPU core. InstallationNodewatch relies on a functioning netfilter *inside* VPS containers. Make sure all VPS containers are configured with netfilter=stateful or netfilter=full (more about netfilter settings on openvz.org). Installation (on host node only; nothing needs to be installed inside containers):
wget http://deploy.vpsantiabuse.com/nodewatch-install.sh
sudo sh nodewatch-install.sh
Now open /nodewatch/scripts/nodewatch_config.php and configure the following settings: // e-mail address for alerts $admin_email = 'your@email'; // your license key, see http://vpsantiabuse.com/ $license_key = '1293819230781023'; // in test mode Nodewatch will not perform suspensions and will not send SMS alerts // however, e-mail alerts will still be sent // Change this to 0 once configured and tested $testmode = 1; Optional settings:
// set to true to enables SMS alerts
$sms_alerts = true;

// cell phone for sms alerts; for US/Canada: '555-5555-555';

// international example: '+55-555-5555-555'
// (+55 = country code with "+" prefix)

// multiple numbers example: '555-5555-555,+66-666-6666-666'
// (up to 3 phone numbers are supported)
$sms_phoneno = '123-4567-890';

// change to true to disable scanning customers' VPS for weak root passwords
$disable_nodewatch_passwords = false;

// change to true to disable scanning customers' VPS for blacklisted process names
$disable_nodewatch_processes = false;

// From: address for e-mail alerts. If not specified, $admin_email will be used.
$admin_email_from = '';

// Do not include inbound packets in pps accounting (this will effectively lead to inbound DoS attacks being ignored)
$limit_packets_ignore_ingress = false;

// Do not include outbound packets in pps accounting (this will effectively lead to outbound floods being ignored)
$limit_packets_ignore_egress = false;
Nodewatch-web section (optional):
// set to true to enable
$nodewatch_web_update_enabled = true; // change to false to disable web updates

// link to update.php, http only
$nodewatch_web_update_url = 'http://yourdomain.com/update.php';

// password for nodewatch-web, must match the password
// set in config.php of your nodewatch-web installation
$nodewatch_web_password = 'secret';
SolusVM integration (optional):
// set to true to enable
$solusvm_calls_enabled = true;

// IP address of the SolusVM master
$solusvm_master_ip = '1.2.3.4';

// TCP Port of the SolusVM master. If empty, port 5656 will be used.
$solusvm_master_port = ''; // (Added in v3.80)

// API id must be created in the SolusVM Admin panel, menu: Configuration->Api Access
$solusvm_master_api_id = 'ididididididididididididididid';

// API key must be created in the SolusVM Admin panel, menu: Configuration->Api Access
$solusvm_master_api_key = 'keykeykeykeykeykeykeykeykeykey';

// Numeric Node ID of this physical server. It can be looked up in the SolusVM Admin panel, menu: Nodes->List Nodes
$solusvm_node_id = '2';
After all desired changes are made, save the file and restart nodewatch:
sudo /nodewatch/scripts/nodewatch_restart.sh Wait 5 minutes. Now you can watch some statistics. Watching stats
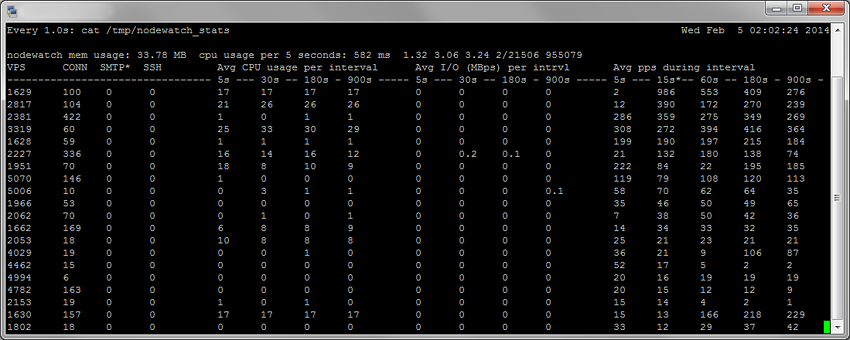
watch -n 1 cat /tmp/nodewatch_stats Sample output:
VPS: VE ID (container ID). Matches VE IDs provided by this command: vzlist -a CONN: Current number of conntrack sessions for this VPS SMTP: Current number of outgoing SMTP connections for this VPS SSH: Current number of incoming AND outgoing SSH connections for this VPS Avg CPU: Average CPU usage for VPS in % (100% = full 1 core load, 200% = full 2 core load). Averages for 5, 30, 180 and 900 seconds. Note that due to the way OpenVZ kernel reports CPU usage, these numbers are not very reliable (it is normal to see erratic output from time to time). Avg I/O: Average I/O (disk) bandwidth for VPS in MiB per second. Averages for 5, 30, 180 and 900 seconds. Avg packets: Average number of UDP + TCP packets per second (sent + received). Averages for 5, 15, 30, 60, 180, 900 seconds.
AlertsYou should only consider changing default values if default thresholds do not work for you.Modify if necessary in nodewatch_config.php: $limits_packets [ 5 ] = 160000; // Send alert when over 160kpps during 5 seconds $limits_packets [ 15 ] = 150000; // Send alert when over 150kpps during 15 seconds $limits_packets [ 60 ] = 130000; // Send alert when over 130kpps during 1 minute $limits_packets [ 180 ] = 120000; // Send alert when over 120kpps during 3 minutes $limits_packets [ 900 ] = 110000; // Send alert when over 110kpps during 15 minutes
$limit_smtp = 200;
Send alert when VPS exceeds 200 simultaneous SMTP conntrack sessions.
$limit_ssh = 30;
Send alert when VPS exceeds 30 simultaneous outgoing SSH conntrack sessions.
$limit_conntrack = 30000;
Send alert when VPS spawns over 30000 conntrack sessions
$limit_conntrack_unreplied = 10000;
Send alert when VPS spawns over 10000 conntrack sessions in UNREPLIED state
An email will be sent to the address provided in nodewatch_config.php file. If a phone number is provided in the configuration file, then an SMS notification will be sent as well. Automatic VPS suspensionModify if necessary in nodewatch_config.php:$limit_packets_suspend = 500000; Suspend VPS if it exceeds 500000 packets per second.
$limit_smtp_suspend = 1000;
Suspend VPS if it exceeds 1000 simultaneous SMTP conntrack sessions.
$limit_ssh_suspend = 100;
Suspend VPS if it exceeds 100 simultaneous outgoing SSH conntrack sessions.
$limit_conntrack_suspend = 55000;
Suspend VPS if it spawns over 55000 conntrack sessions
$limit_conntrack_unreplied_suspend = 20000;
Suspend VPS if it spawns over 20000 conntrack sessions in UNREPLIED state
An email will be sent to the address provided in nodewatch_config.php file upon automatic suspension. If a phone number is provided in the configuration file, then an SMS notification will be sent to your phone as well. If SolusVM Master details are provided in the configuration file, Nodewatch will also send a notification to the SolusVM master. How VPS suspension worksNodewatch executes the following shell command to suspend a VPS:
vzctl set VEID --disabled yes --saveThis prevents VPS from starting, but will not stop it. After VPS is disabled, Nodewatch removes all IP addresses assigned to the VPS: vzctl set VEID --ipdel allThis stops all network traffic to/from VPS while VPS is being shut down. Note that this action has temporary effect, no changes to the configuration files are made as no --save parameter is used. Then Nodewatch stops the VPS: vzctl stop VEID How to unsuspend a VPS after automatic suspensionvzctl set VEID --disabled no --saveYou can then start the VPS: vzctl start VEID If SolusVM Master details are provided in the configuration file, then you can also unsuspend the VPS directly from the SolusVM Master. WhitelistingIf you need to allow your customer to run mass mailing campaigns, mailing lists, etc, it is quite easy to whitelist their VPS. Simply add their VEID to one (or several) of the following files:/nodewatch/scripts/smtp_whitelist – for smtp connections /nodewatch/scripts/ssh_whitelist – for ssh connections /nodewatch/scripts/conntrack_whitelist – for conntrack connections /nodewatch/scripts/processes_whitelist – for malware processes /nodewatch/scripts/pps_whitelist – for packet counters To whitelist multiple VPS, add one VEID per line. Starting with version 3.20, changes made to whitelists are applied immediately, there is no need to restart Nodewatch. Note that you will still get e-mail and SMS alerts even if the VPS is whitelisted. If you want to disable alerts, add a dot after VEID. Examples of valid whitelist entries:
1140
1150
1160.
1170.
In the example above:
Weak root password detectionNodewatch uses John the Ripper to automatically scan your user's VPS for weak passwords. (John is installed automatically during Nodewatch installation, there is no need to install it separately). When a weak password is discovered, it is immediately replaced with a randomly generated password. A message is then thrown onto user's VPS console with new password as well as a record is sent to the syslog inside of the VPS. Detection of running malware processesNodewatch is actively looking for known trojans, DoS attack tools, backdoors, etc. Some examples of what Nodewatch can detect:
.IptabLes
Once a malware process is detected, the VPS is immediately suspended and an alert is sent. Centralized configurationNodewatch 3.40 and newer support remote configuration:
1) Rename nodewatch_config.php to nodewatch_config.txt
<?php
    $nodewatch_remote_config = 'http://example.com/nodewatch/nodewatch_config.txt';
?>
Then restart Nodewatch as usual and it will automatically pick up the remote configuration file. Nodewatch will re-download the configuration file upon manual execution of nodewatch_restart.sh. NOTE:Current version of Nodewatch does not support comments in remote configuration. Please remove all comments before uploading the file. This will be addressed in future releases. Updating to latest version
sudo /nodewatch/scripts/update.shInvoking this script will update and restart your Nodewatch installation. Allow 2-3 minutes after updating for stats to re-appear. Uninstallingsudo rm -f /etc/cron.d/vpsantiabuse sudo /nodewatch/scripts/nodewatch_restart.sh sudo rm -rf /nodewatch Integration, CustomizationSince we released Nodewatch, we received many requests for adding more customization capabilities to Nodewatch (hooks, customized emails to clients, etc). Please keep in mind that the core function of Nodewatch is abuse prevention (or, in other words, "Uptime preservation"). It is not designed to enforce customized limitations, send out notifications to clients etc. Instead its main point is to prevent downtime or other issues caused by attacks (for example, getting IPs blacklisted). The issue with Nodewatch performing additional tasks is that they must be done in a separate thread to not affect the main daemon. For example, sending out an email could appear as a trivial task, however it takes way too long for it to be executed in main thread - it would significantly affect the core function of Nodewatch. Adding separate threads to handle customizations would add significant complexity, which, in turn, would make this project a lot harder to maintain. With that out of the way, there are currently two options for custom actions:
|